The Grid Widget allows you to add and edit project-related data that is reported on over a period. It allows you to add and update records using a pivoted view instead of a list of records.
This article covers:
- Use Cases
- How to access the Grid widget
- How to add records using the Grid
- How to copy records using the Grid
- How to update interval dates using the Grid
- How to update records using the Grid
- How to edit in Grid when grid settings and data is mismatched
Use Cases
- Costs: You would typically manage your budgets by Category, Sub Category and Year & Month which would then translate into a significant amount of records if you project runs over lets say a 12 or 24 or 36 month period.
- Resource Allocations: When you are recording allocations for team members on your project for a period of time resulting in numerous records. Resource allocation records typically use a Start and End date that can be specified in the Grid.
- Benefits: This is also typically recorded for a period of time. Generally monthly, quarterly or even annually. Benefits generally have a Realisation Date that would be used in the Grid.
For this article, we will be using Costs as the use case. Reporting by Category, Sub Category, Year and Month.
How to access the grid widget
You can access the Grid from your Project View page by scrolling to the Costs section, or from the Cost list (or any other list page, depending on which entity you are using to capture records).
How to add records using the grid widget
Click on the Action menu for Costs and select Add in Grid.
The first time that you use the Grid for a specific entity, you will be redirected to the Grid Settings page.
When your Settings are saved, PPO will remember your preference. You can however update your preference settings for the Grid using your Settings gear icon when on the Grid.
(1) Editable fields: Allows you to select the fields that will be editable and will have the same values for all records in the pivot. If your selection doesn't include all required fields, these will be added in addition on the Grid. In the above example, we generally have Budgets per Category / Cost Category.
(2) Measures: Allows you to select the fields that will be the measure fields and will have a value for each interval. For the Cost example, you would generally start off on day zero with Budget and Estimate to Complete / Forecast.
(3) Create for zero values: Indicates whether records should be created for measure values of 0. It could be that you already want to create your 12 cost records for the year, but currently only have budgets for the first 6 months. If you select yes, then the Grid will create all 12 records even though six months have a 0 value.
(4) Period type: Allows selecting the type of period field configuration. This could either be a date field (i.e. start and end for Resource Allocation), Date custom list field (i.e. Year/Month) or Year and Month (i.e. Year and month custom list fields). For our Costs use case, we will be using Year and Month fields. Screenshot examples below:
Year and Month as separate fields:
Year/Month Custom list:
Date fields:
(5) Custom List Year Period: Allows you to select the Year custom list field.
(6) Selected Year Items: Allows you to select the year custom list items that will be used for the period of the grid. In this case we have only selected 2025.
Include all items of the custom list: For Year, we only specify the years we need cost records for, else cost records will be created for All the years that exist in that custom list (i.e. 2019, 2020, 2021, 2023 which are in the past).
(7) Custom List Month Period: Allows you to select the custom list field that will be used for the Month part of the period.
(8) Selected Month Items: Allows you to select the month custom list items that will be used for the period of the grid.
Include all items of the custom list: For this month option, it would make sense to select Yes if you want to record costs for a 12 month period.
Once you have configured the above Settings, click on the Save button. You will then be redirected to the Grid Add page:
As seen below, you now have a Grid view that will allow you to specify per Category & Sub Category your Budget & Estimate to Complete values for 2025 over a period of 12 Months.
Below you will notice we only specified values for month 1 to 10. Due to us opting to create records for "0" values, if we submit, the cost records for month 11 and will be created, even though we haven't captured data in it.
Prior to submitting your data on the Grid, you can click on the Preview button to ensure the records are going to be added as expected.
You can then Close the Preview page and click on Submit:
You will be redirected to the Cost List page for your Project show all 12 records that were added:
How to copy records using the grid widget
When using the Grid Widget, you can quickly duplicate a row using the Copy Row function. This is useful when you need to add multiple similar records — for example, repeating costs, benefits, or resource allocations and want to save time re-entering the same data.
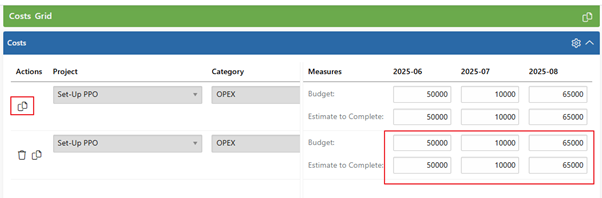
To copy a row:
-
Hover over the row you want to duplicate.
-
Click the Copy Row icon (located at the end of the row).
-
A new row will appear below with all the same values pre-filled.
-
Update only the fields you want to change (e.g. description, amount, etc.).
-
Save your changes.
How to update interval dates using the Grid
The Grid Widget allows you to generate column headers based on time intervals, ideal for planning or tracking records across defined periods like years, months, quarters, or weeks.
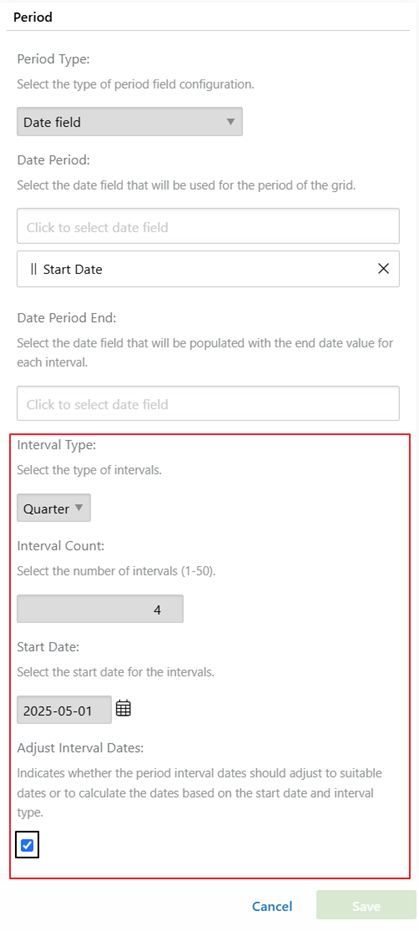
NB The "Adjust Interval Dates" setting is only available when the Period Type is set to a Date field (e.g. Planned Start Date, Actual Date, etc.).
How to Configure Intervals:
In your grid widget settings, set the Period Type to a date field.
-
Choose the Interval Type:
-
Weekly
-
Monthly
-
Quarterly
-
Yearly
-
-
Enter the Number of Intervals (how many columns you want).
-
Set a Start Date (the point from which intervals begin).
Adjusting Interval Dates:
You’ll see an option called “Adjust Interval Dates” — this controls how the grid calculates the period columns.
-
Checked (default): Dates will align with the standard calendar. E.g. If Quarterly is selected and the start date is 15 Feb 2025, the periods will be:
-
01 Apr 2025
-
01 Jul 2025
-
01 Oct 2025
-
-
Unchecked: Dates will be calculated by adding the interval length to your selected start date. Using the same example, the periods would be:
-
15 Feb 2025
-
15 May 2025
-
15 Aug 2025
-
How to update records using the Grid
From the Project View page or the Cost List page, under the Cost Actions menu, select the Cost records you want to Edit and select Edit in Grid:
In Grid Edit mode, you will see color coding of rows. Example: I want to update only month 11 and 12 where I didn't add a Budget & Estimate to Complete initially:
When I select only those 2 records and select Edit in Grid, you will see the below. (1) Highlighted in Green. If you populate data in the Green Rows, you will be adding additional records. (2) Highlighted in Amber are the records that you selected to Edit from your list page. You will also notice a (3) Legend in the bottom right corner.
From this page you will also see the (4) Add icon if you would like to add Other new Cost records.
If you submit and a row is highlighted in Red, this means an Error and you would need to rework the specific Cost records and re-submit.
For more information on Costs, see this article.
How to edit in Grid when grid settings and data is mismatched
When using the Edit in Grid feature, PPO gives you the flexibility to edit multiple records at once using a period-based layout. However, there may be times when the selected data (e.g. specific cost or resource records) doesn’t match the current grid widget settings (e.g. different timeframes or period intervals).
To help you manage this, PPO will prompt you when a mismatch is detected.
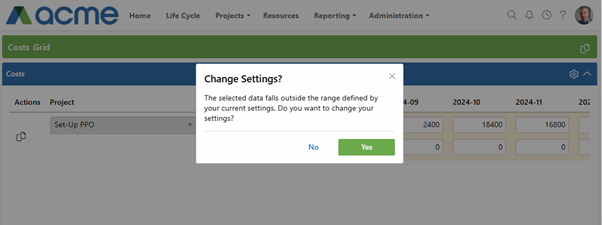
The user can choose:
-
Yes – You’ll be taken to the grid widget settings page to review and update the period configuration before editing.
-
No – The grid will show period columns for both the selected data and the current settings.